


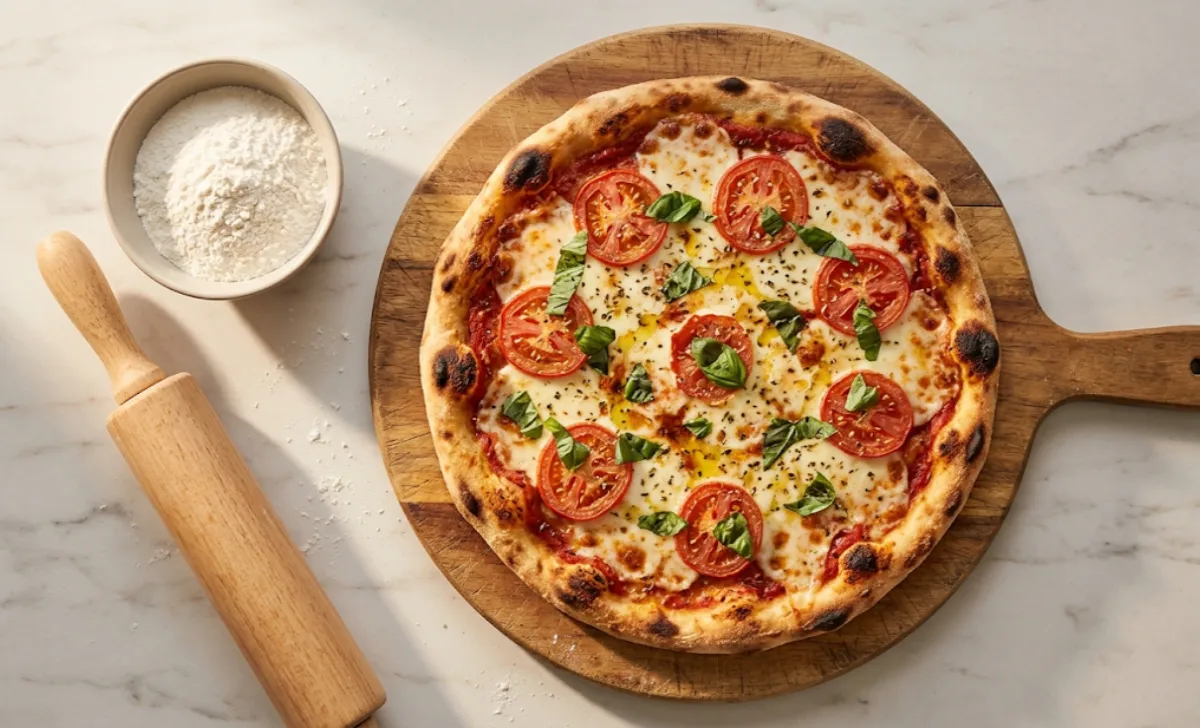
If you’ve ever bitten into a gluten-free pizza and thought, “This tastes like cardboard on a cracker,” you’re not alone. Most store-bought gluten-free crusts are dry, crumbly, and nothing like real pizza. The good news? A homemade gluten-free pizza dough recipe can genuinely rival a traditional wheat-based crust — if you know what you’re doing.
This guide walks you through everything: the right flour blends, the role of binding agents, fermentation tips, and baking techniques that make the difference between a sad, brittle crust and one that’s golden, crispy on the edges, and satisfyingly chewy in the middle.
Whether you have celiac disease, a wheat sensitivity, or you’re simply cooking for someone who does, these tips will change how you approach gluten-free baking altogether.
1. Choosing the Right Gluten-Free Flour Blend
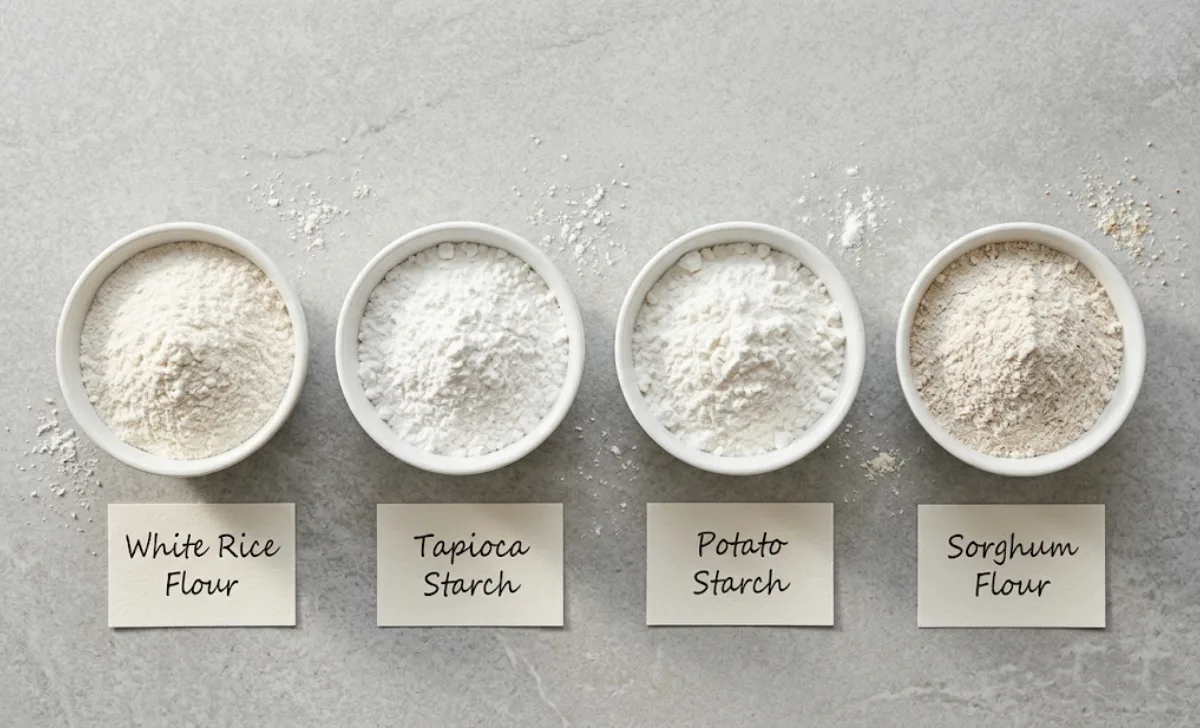
The single biggest factor in a good gluten-free pizza dough recipe is your flour. Not all gluten-free flours behave the same way, and using just one type almost always results in a disappointing crust.
The best results come from a blend. Here’s why:
- Rice flour (white or brown) provides structure and a mild flavour
- Tapioca starch adds chewiness and stretch — the closest thing to gluten’s pull
- Potato starch contributes lightness and helps with browning
- Sorghum flour adds a slightly nutty flavour and nutritional depth
A solid starting ratio is 2 parts rice flour + 1 part tapioca starch + ½ part potato starch. Many commercial blends like Bob’s Red Mill 1-to-1 or King Arthur Measure for Measure work well, but mixing your own gives you more control over texture.
Avoid coconut flour as a base — it absorbs too much liquid and produces dense, gummy results. Almond flour works but creates a completely different, more crumbly texture better suited to thin-crust styles.
If you enjoy experimenting with alternative grains in your kitchen, the preparation techniques used in dishes like this kouskousi recipe can give you a feel for how different starches and grains behave when hydrated — a skill that directly applies to gluten-free dough work.
2. The Role of Xanthan Gum and Binding Agents
Gluten does two key things in traditional pizza dough: it traps gas bubbles (which makes dough rise and stay airy) and it provides the elastic, stretchy network that holds everything together. Without gluten, you need something to fill that role.
Xanthan gum is the most common substitute. It mimics gluten’s binding and elasticity at a small dose — typically ½ teaspoon per cup of flour blend. Too little and your dough crumbles; too much and it gets gummy and dense.
Other binding options worth knowing:
- Psyllium husk powder — creates a slightly more bread-like texture and works well with yeast-leavened doughs. Use about 1 teaspoon per cup of flour.
- Ground flaxseed — a natural binder that adds mild nuttiness. Works well when mixed with water first (1 tbsp flax + 3 tbsp water).
- Eggs — if not making a vegan crust, eggs add structure and richness. One whole egg often replaces the need for xanthan gum entirely in thin-crust recipes.
If your pre-made flour blend already contains xanthan gum (check the label), don’t add more. Double-dosing is one of the most common causes of rubbery, unpleasant gluten-free crusts.
3. Getting the Hydration Right
Gluten-free doughs are wetter than wheat doughs — and that’s intentional. The starches and flours used need more water to hydrate properly, and a well-hydrated dough produces a much better final texture.
Expect your gluten-free pizza dough to look more like a thick batter than a traditional dough ball at first. That’s normal. Don’t be tempted to add more flour just to make it feel “right.”
Signs your dough is properly hydrated:
- It spreads when pressed, but holds its shape
- It’s sticky but not soupy
- After resting, it firms up slightly
A hydration level around 75–85% (that’s 75–85g of water per 100g of flour) is a good target for most blends. Warmer environments may require slightly less water; drier climates may need a touch more.
Letting the dough rest for 15–30 minutes after mixing allows the starches to fully absorb the liquid. Skipping this step often leads to dough that’s still wet in the centre after baking.
4. Yeast vs. No-Yeast Gluten-Free Dough
Both approaches have a place in a gluten-free kitchen, but they produce noticeably different results.
Yeast-leavened dough takes longer but produces a far better crust. Active dry yeast or instant yeast works well. The fermentation process adds flavour complexity you simply can’t get from baking powder alone. For best results, let the dough rise for 45–60 minutes in a warm spot.
One important note: gluten-free dough doesn’t “double in size” the way wheat dough does. You’ll see some rise, maybe 25–30%, but don’t wait for a dramatic puff before proceeding.
No-yeast (quick) dough uses baking powder as the leavening agent. It comes together in under 15 minutes and works well for weeknight meals. The crust tends to be denser and more biscuit-like, but with the right toppings and a hot oven, it’s perfectly satisfying.
Best use cases:
| Yeast Dough | No-Yeast Dough |
|---|---|
| Weekend pizza nights | Quick weeknight meals |
| Deeper flavor desired | Minimal prep time |
| Thicker, chewier crust | Thin, crisp crust |
5. How to Shape Gluten-Free Pizza Dough
This is where most beginners struggle. Gluten-free dough won’t stretch like traditional dough — you can’t toss it in the air or hand-stretch it without it tearing.
The most reliable method is the wet-hand press technique:
- Lightly oil your hands and your baking surface (parchment paper works best)
- Place the dough ball in the centre of the parchment
- Press outward from the centre using your fingertips and palms
- Work in gradual, circular motions — don’t rush it
- Aim for an even thickness of about ¼ inch
A piece of plastic wrap or another sheet of parchment placed over the dough and then rolled with a rolling pin is another effective method. The barrier prevents sticking and keeps the surface smooth.
Raised edges (a classic pizza lip) can be shaped by gently pushing the outer edge upward with your thumb and forefinger. Be patient — the dough is workable, it just doesn’t have the same forgiving stretch as wheat dough.
6. Pre-Baking the Crust
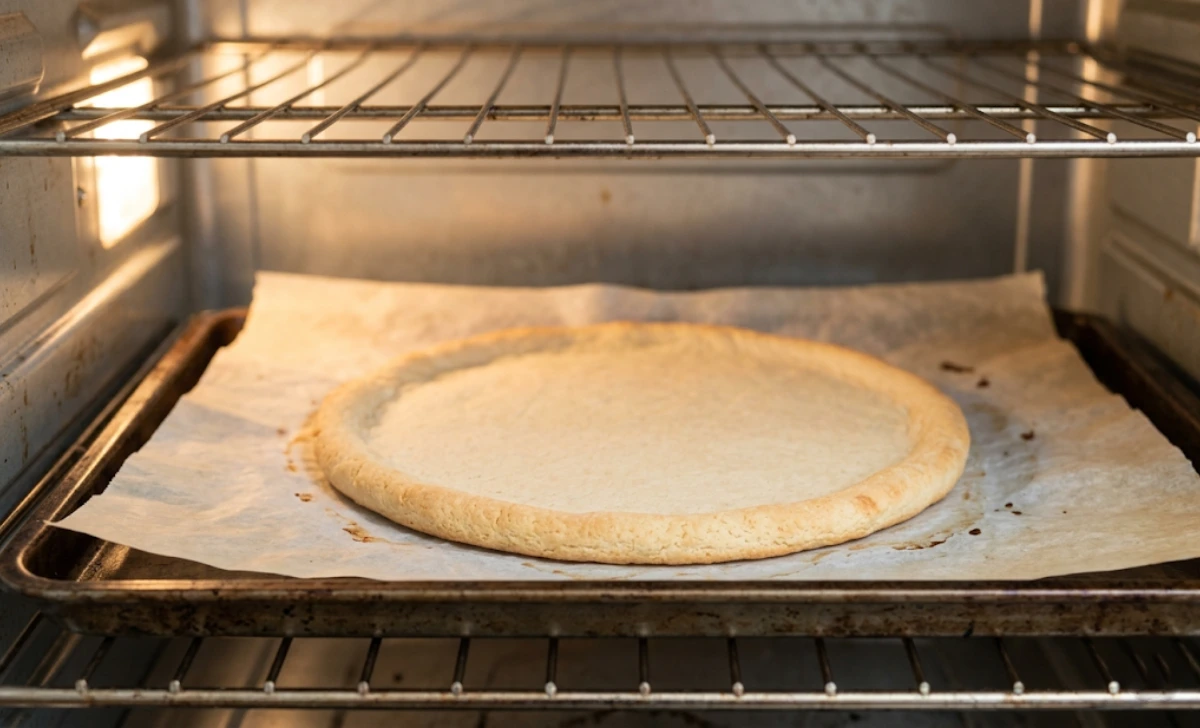
This step alone will transform your results. Pre-baking (also called “par-baking”) the shaped crust before adding toppings addresses one of gluten-free pizza’s biggest problems: a soggy centre.
Here’s the process:
- Shape your dough on parchment
- Brush lightly with olive oil
- Bake at 425°F (220°C) for 10–12 minutes until it firms up, and the edges start to colour
- Remove from oven, add sauce and toppings
- Return to oven for another 10–12 minutes
The par-bake step allows moisture to escape from the crust itself before the toppings add more. It also sets the structure so the crust doesn’t collapse under the weight of the sauce and cheese.
This principle of building layers and managing moisture carefully is something you’ll also encounter in layered baked dishes. If you’re interested in recipes that handle both starch and cheese together, this lasagna baked potatoes recipe is a great study in how heat and layering create satisfying texture.
7. Temperature and Baking Surface Matter
High heat is your friend when baking gluten-free pizza. Most home ovens should be set to at least 425°F (220°C), with 450°F (230°C) being even better if your oven can maintain it consistently.
Baking surface options:
- Pizza stone — the best option. Preheated for at least 45 minutes, it delivers intense bottom heat that crisps the crust beautifully.
- Cast iron skillet or pan — preheated in the oven before adding the dough, this works nearly as well as a stone.
- Perforated pizza pan — allows air circulation from below and gives a noticeably crispier bottom than a solid pan.
- Regular baking sheet — works fine, but the bottom crust will be softer and paler.
One tip: always bake on the lower rack of your oven. This puts the bottom of the pizza closer to the heat source, which improves browning and crispiness.
8. Cauliflower Crust as a Low-Carb Alternative
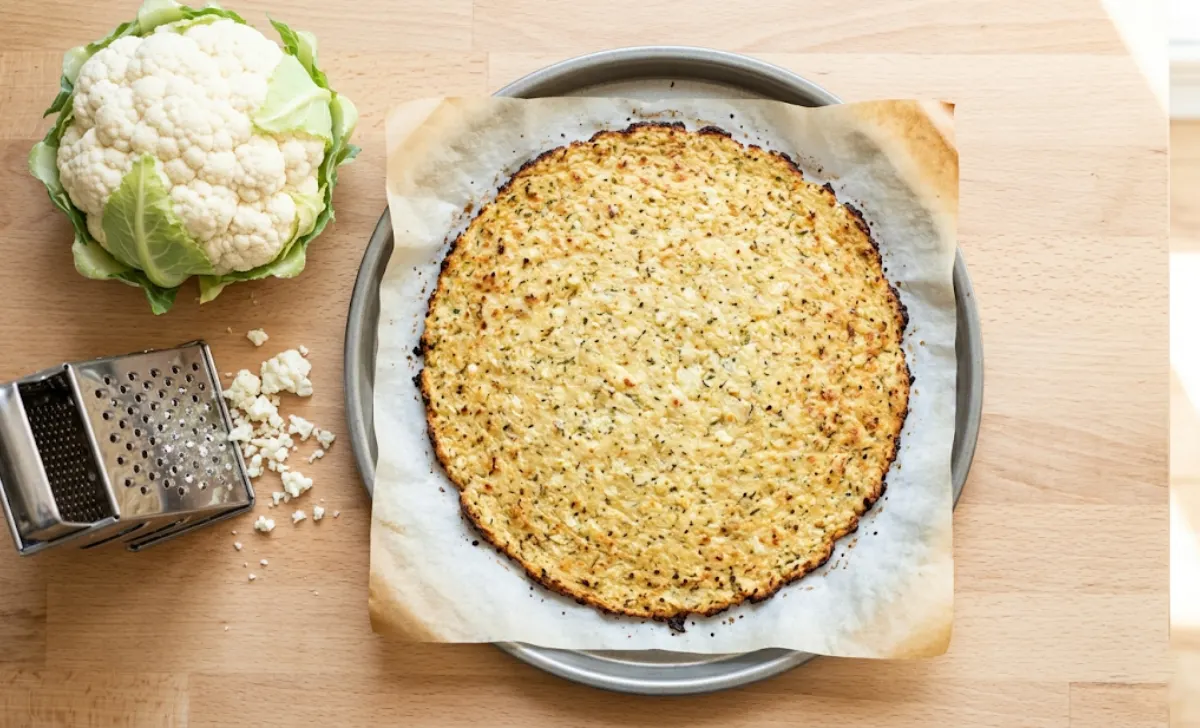
No conversation about gluten-free pizza dough is complete without addressing cauliflower crust. It’s not technically a “dough” in the traditional sense, but it’s become a popular alternative for people managing both gluten and carbohydrate intake.
How to make it:
- Rice a whole head of cauliflower in a food processor
- Microwave or steam for 5 minutes, then cool completely
- Squeeze out as much moisture as possible using a clean kitchen towel — this step is critical
- Mix with egg, shredded mozzarella, garlic powder, and Italian seasoning
- Press into a thin circle on parchment and bake at 425°F for 20–25 minutes until golden
The result is a crust that holds toppings reasonably well and has a mild, slightly nutty flavor. It won’t pass as traditional pizza crust — but that’s not the goal. It’s a different product with its own merits.
For the best texture, keep toppings light. Heavy sauces and too much cheese will cause the crust to steam and soften. Less is more here.
9. Storing and Freezing Gluten-Free Dough
Gluten-free pizza dough freezes exceptionally well — arguably better than wheat-based dough, which can develop off flavours during long freezes.
Refrigerator storage: Wrapped tightly in plastic wrap or stored in an airtight container, unbaked dough keeps for 2–3 days. The cold fermentation actually improves flavour.
Freezing unbaked dough:
- Shape the dough into individual portions
- Wrap each tightly in plastic wrap, then place in a zip-lock bag
- Freeze for up to 3 months
- Thaw overnight in the refrigerator before using
Freezing par-baked crusts:
- Par-bake as described above, then cool completely
- Stack between sheets of parchment, wrap tightly, and freeze
- To use: add toppings directly to the frozen crust and bake at 425°F for 12–15 minutes
This method means you can have pizza ready in under 20 minutes on any given weeknight. Batch-cooking par-baked crusts on weekends is one of the most practical habits for anyone eating gluten-free regularly.
For ideas on other versatile ingredients that work well with gluten-free cooking and batch preparation, the lyposingrass guide covers aromatic ingredients that pair beautifully with pizza-style dishes.
Expert Tips
- Weigh your ingredients — volume measurements for gluten-free flours are notoriously inconsistent. A kitchen scale makes a real difference.
- Use warm (not hot) water for yeast activation — aim for 100–110°F (38–43°C). Too hot kills the yeast; too cold and it won’t activate.
- Rest your dough after shaping — even 10 minutes allows the starch to relax and makes baking more even.
- Add a teaspoon of apple cider vinegar to your dough — it improves rise and adds a subtle tang that enhances flavor.
- Brush with garlic butter before the second bake — it adds color and flavor to the crust edges, making the final pizza look and taste far more polished.
- Don’t overload with toppings — gluten-free crust is less sturdy than wheat crust. Keep toppings moderate and pre-cook anything that releases significant moisture (mushrooms, spinach, zucchini).
Common Mistakes to Avoid
1. Using only one type of flour. Single-flour crusts are almost always too dense, gummy, or crumbly. Always blend.
2. Adding too much xanthan gum. More is not better here. Excess xanthan gum creates a rubbery, unpleasant texture. Stick to the recommended amount.
3. Skipping the rest period. Rushing straight to shaping after mixing means the starches haven’t fully hydrated. The dough will be harder to work with and bake unevenly.
4. Adding toppings to an unbaked crust. Without par-baking, the centre of the pizza will almost always come out wet and underdone. This step isn’t optional for good results.
5. Using a cold baking surface. Putting dough onto a cold pan results in uneven cooking and a soft, pale bottom crust. Preheat your stone or cast iron.
6. Not reading your flour blend’s label. Some blends already contain xanthan gum, leavening agents, or salt. Adding more of these on top ruins the balance of the recipe.
Conclusion
A great gluten-free pizza dough recipe isn’t about compromise — it’s about understanding how different ingredients behave and building the right technique around them. Start with a well-balanced flour blend, use the right amount of binding agent, hydrate properly, and never skip the par-bake step.
The difference between a disappointing gluten-free crust and a genuinely enjoyable one often comes down to just a few details: the right flour ratio, enough moisture, a well-preheated baking surface, and a bit of patience.
Try the methods in this guide, experiment with your flour blends, and don’t get discouraged if your first attempt isn’t perfect. Every batch teaches you something. By your third or fourth pizza, you’ll have developed enough intuition to make adjustments on the fly — and that’s when homemade gluten-free pizza really starts to shine.
FAQs
Can I make gluten-free pizza dough without xanthan gum?
Yes. Psyllium husk powder is a solid substitute and produces a slightly more rustic texture. Eggs also work as a natural binder in non-vegan recipes. Some rice-flour-heavy blends work reasonably well without any binder if the dough is kept thin and par-baked.
Why does my gluten-free pizza crust fall apart?
The most common causes are too little binding agent, not enough hydration, or skipping the rest period after mixing. Make sure your flour blend and water ratios are accurate, and allow the dough to rest before shaping.
Can I use a bread machine to make gluten-free pizza dough?
Yes, with some adjustments. Use the dough cycle only, and add ingredients in the order your machine recommends. Because gluten-free dough doesn’t knead the same way, reduce the kneading time if your machine allows it. The dough will look more like a thick batter in the machine — that’s expected.
How do I make gluten-free pizza dough dairy-free as well?
Most basic gluten-free pizza dough recipes don’t contain dairy — it’s the toppings where dairy appears. Simply swap out any butter in the recipe for olive oil, and choose a dairy-free cheese alternative for topping. The dough itself is naturally dairy-free in most cases.
Is gluten-free pizza dough healthier than regular pizza dough?
Not automatically. Gluten-free dough is a necessity for people with celiac disease or gluten sensitivity, but it’s not inherently more nutritious than wheat-based dough. In fact, many gluten-free blends are lower in fibre and certain B vitamins. Adding sorghum flour, buckwheat, or teff to your blend can help improve the nutritional profile.