


If you’ve ever flipped through a sewing pattern or watched a dressmaking tutorial and stumbled across the word Nahttypen, you’re not alone. I felt the same way the first time I saw it.
In plain terms, Nahttypen just means “seam types” in German. But knowing your seam types isn’t just about vocabulary. It’s about understanding which seam will hold up under stress, which one lies flat against a silk blouse, and which one keeps your favourite jeans from splitting at the worst moment.
Let’s walk through this step by step, in a way that actually makes sense for real sewing projects.
What Are Nahttypen? (A Quick Overview)
Think of Nahttypen as the personality behind your stitch. Two pieces of fabric join together, yes — but how they come together changes the entire result.
Some seams are meant to be seen (decorative topstitching is a good example). Others stay hidden inside linings or between layers. And some, like flat-felled seams, are built to survive years of washing and heavy wear.
Once you understand a handful of seam types, you stop guessing and start choosing the right one for the job. That shift — from guessing to choosing — is when sewing becomes genuinely satisfying.
Start Here: A Simple Decision Guide
Before you read further, try this quick mental flowchart. It covers most situations you’ll actually run into:
- Is the fabric sheer, lightweight, or prone to fraying? → French seam
- Is the seam straight and the fabric heavy like denim or canvas? → Flat felled seam
- Does the fabric stretch (knits, jersey, spandex)? → Overlock or narrow zigzag
- None of the above? → Plain seam with a finished edge
That’s genuinely 80% of the decision. Keep the details below as a reference once you’ve picked your direction.
The Most Common Seam Types You’ll Actually Use
You don’t need to memorise fifty different Nahttypen. Most home sewists rely on five or six core seam types for nearly all their projects. Here are the ones worth knowing first.
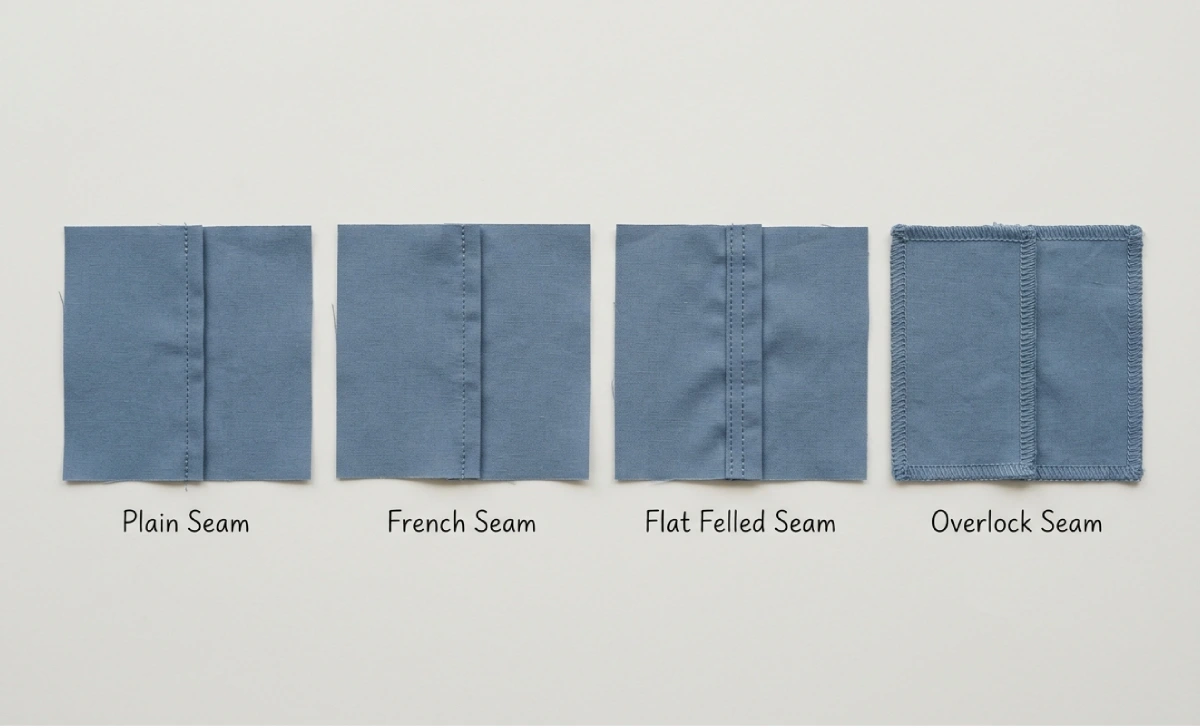
Plain Seam (Normaler Nahttyp)
This is the workhorse of sewing. Place two fabric pieces right sides together, stitch a straight line roughly 1.5 cm from the edge, and press it open or to one side. That’s the whole thing.
Tops, skirts, bags, pillow covers — the plain seam is your starting point for almost everything. The catch is that raw edges are left exposed, so you’ll want to finish them with a zigzag stitch, pinking shears, or an overlocker. Skip this step, and you’ll likely find loose threads pulling apart in the wash.
When I use it: Nearly every project, unless the fabric or purpose genuinely calls for something stronger or cleaner.
Seam allowance note: Most patterns default to 1.5 cm for plain seams. That’s a reliable starting point, but always check the pattern instructions before you cut.
French Seam (Französische Naht)
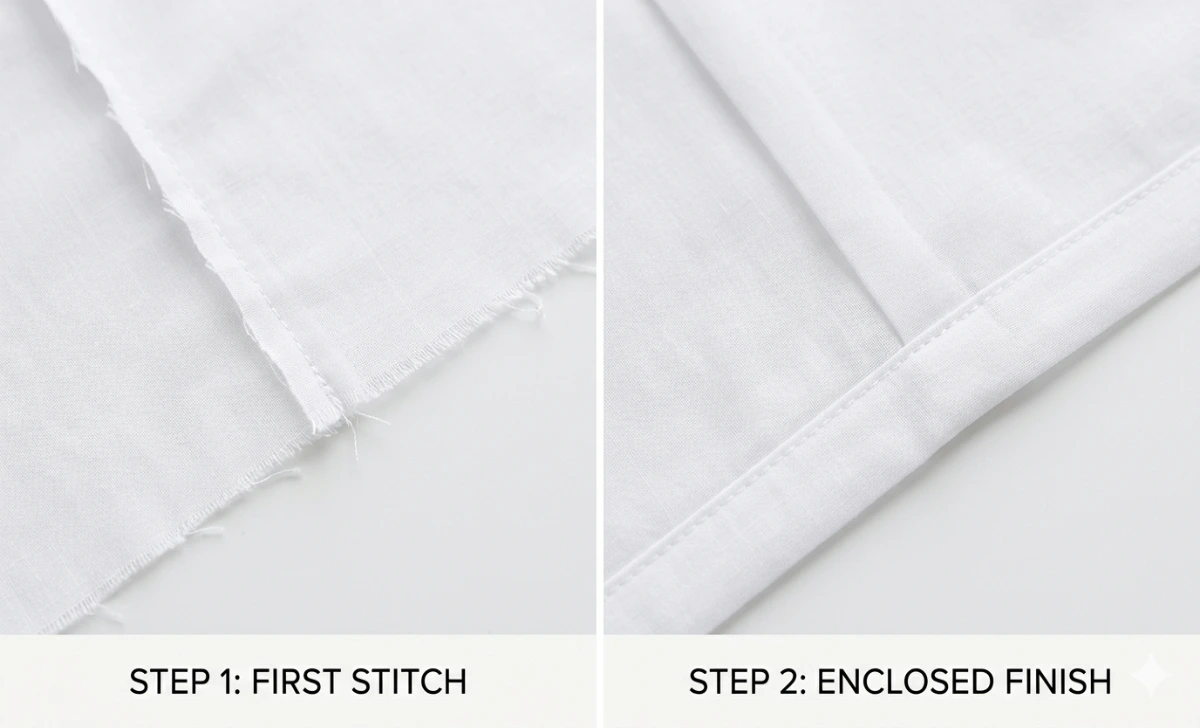
If you’ve ever worked with chiffon, organza, or any lightweight fabric that frays the moment you look at it, French seams are the answer. They’re also one of the most visually satisfying Nahttypen once you get the hang of them.
Here’s how it works: sew the fabric wrong sides together first, trim the seam allowance down to about 6 mm, then fold it so right sides face each other and stitch again. The raw edges get wrapped inside a neat little tunnel — no fraying, no exposed threads, a clean finish on both sides.
Seam allowance note: French seams require a bit more planning. You’ll typically start with a 1.5 cm allowance, stitch, trim to 6 mm, then complete the seam. If you follow a pattern’s standard allowance and skip this trim step, the seam will bulge, and the finish won’t lie flat. It’s an easy fix once you know it’s coming.
It does take longer than a plain seam. But for unlined garments — a linen summer dress, a silk camisole, anything sheer — it’s completely worth the extra time. They feel expensive, because they reflect careful construction.
A practical tool tip: A standard presser foot works fine for French seams, but if you find yourself struggling to keep the folded edge even, an edgestitching foot gives you a steady reference point.
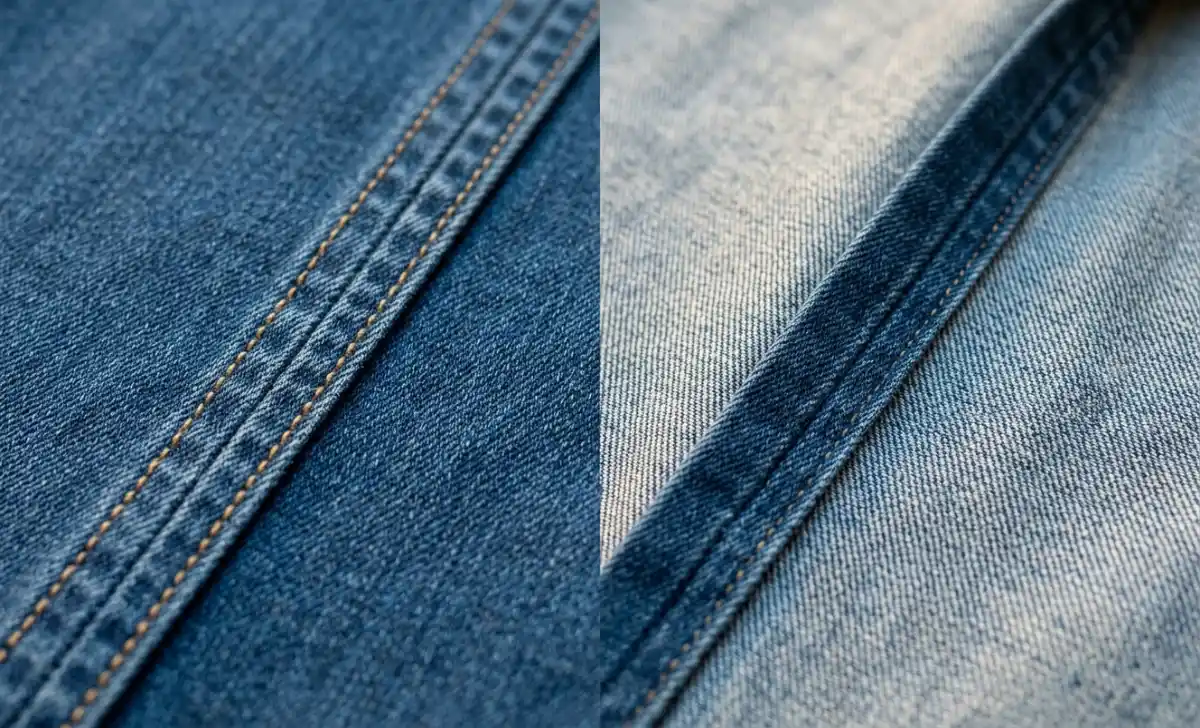
Flat Felled Seam (Flachnaht)
This is the seam running down the leg of your jeans. It’s also on most work shirts, canvas tote bags, and any item that needs to last through serious use. Flat-felled seams are genuinely tough — one side of the seam allowance gets trimmed short, the other folds around it and stitches flat. No raw edges. No fraying. Two visible rows of parallel stitching on the outside.
Seam allowance note: Unlike the plain seam, flat felled seams need uneven allowances — one side is typically trimmed to about half the width of the other before folding. Many beginners miss this and end up with a lumpy fold that won’t lie flat. Cut unevenly on purpose. That’s the whole point.
The tradeoff? It takes practice, and it doesn’t work well on tight curves. I once tried a flat-felled seam on a curved sleeve and spent almost an hour unpicking it. Save this seam for straight-grain seams. On those, nothing beats the durability.
For repairs too: If a seam in your jeans or a canvas bag splits open, a flat felled repair is one of the strongest fixes you can make by hand or machine.
Overlock Seam (Versäuberte Naht)
If you own a serger, this one is already in your regular rotation. An overlock seam trims, sews, and finishes the edge in a single pass. It’s quick, it has built-in stretch, and it’s the go-to for knits — T-shirts, leggings, sweatshirts, anything that needs to move with you.
That said, you don’t need a serger. Most modern sewing machines include an overcast stitch or a stretch stitch that handles knit seams very well. I sewed knit garments for two years on a basic machine before ever touching a serger.
A reality check for beginners: Don’t let anyone pressure you into buying a serger straight away. A zigzag stitch on a regular machine handles the majority of stretch seams just fine. Get comfortable with your current machine first.
Sewing your own clothes can add up in equipment costs if you’re not careful about what you actually need early on. If you’re also trying to manage your overall spending while building out a sewing hobby, it’s worth reading about how to avoid lifestyle inflation — the same principle applies whether you’re shopping for sergers or anything else.
Fabric-to-Seam Quick Reference
If you want a fast reference before starting a project, this covers most fabrics you’ll encounter:
| Fabric | Best Seam Type |
|---|---|
| Chiffon, organza, voile | French seam |
| Denim, canvas, twill | Flat felled seam |
| Jersey, spandex, knits | Overlock or narrow zigzag |
| Linen, cotton, medium-weight wovens | Plain seam with finished edges |
| Silk, lightweight satin | French seam |
| Fleece, wool, upholstery fabric | Plain seam with serged or bound edge |
Keep this somewhere accessible when you’re planning a new project. It saves a lot of second-guessing.
What Happens If You Choose the Wrong Seam
This section exists because I’ve made every one of these mistakes and nobody told me what to expect.
- Plain seam on chiffon, no finishing. The fabric frays apart after the first wash. You’re left with a gap where a seam used to be. Solution: French seam from the start, or at minimum a very tight zigzag finish before the seam goes near water.
- Flat felled seam on a curved armhole. I mentioned this above. The fold won’t ease around the curve, no matter how many pins you use. You’ll unpick it and start over. Stick to straight grain for flat-felled seams.
- Skipping the press between steps. Pressing isn’t optional. An unpressed seam looks homemade in the worst sense of the word. A quick press after each seam line transforms how a garment drapes and hangs.
- Following a pattern’s default allowance for a French seam. Most patterns assume a plain seam. If you switch to French, you need to plan your allowances from the cutting stage. Cutting at 1.5 cm, then trying to trim and fold a French seam, often leaves too little fabric to work with.
Helpful Tools That Make a Real Difference
You don’t need a huge toolkit to sew good seams. But a couple of small additions make certain Nahttypen much easier to execute:
- Edgestitching foot: Keeps your stitching line straight and parallel to a fold. Genuinely useful for flat-felled seams and topstitching.
- Rolled hem foot: Creates a clean, narrow hem on lightweight fabrics — it can mimic the tidy finish of a French seam on very fine fabric like organza.
- Seam gauge: A simple ruler with a sliding marker. Helps you maintain consistent seam allowances without constantly measuring from scratch.
None of these is expensive. If you’re looking for ways to keep your hobby costs low while still improving what you make, the same mindset applies to sewing tools as it does to smart home upgrades that save money — buy the thing that earns its place, not the thing that just looks useful on a shelf.
How to Choose the Right Nahttyp for Your Project
You’ve seen the quick guide at the top. Here it is with a little more context.
Ask these three questions before you sew a single stitch:
- Will the seam be visible from the outside? If yes, French or flat-felled seams look more polished and intentional.
- Does the fabric fray easily? If yes, avoid a plain seam without finishing. A French seam or a tight zigzag edge is a better choice.
- Does the seam need to stretch? If yes, an overlock seam or a narrow zigzag gives the seam line flexibility without popping.
That’s genuinely most of the decision. The rest is practice.
Common Mistakes Beginners Make
These are worth naming directly, because they’re easy to avoid once you know they’re coming:
- Using a plain seam on fray-prone fabric without finishing the edges. It unravels after one wash. The fix is simple: zigzag or French seam before the project goes anywhere near the laundry.
- Skipping pressing between steps. I keep saying this because it keeps mattering. Press your seams. Every time.
- Choosing the wrong seam for a curve. Flat-felled seams on tight curves like armholes or necklines cause frustration and wasted time. Use a plain seam or overlock stitch on curves.
- Not adjusting seam allowances when switching seam types. French and flat-felled seams both need specific allowance widths to work correctly. Don’t assume the pattern’s default will transfer.
Practical Next Steps: Start With One Seam at a Time
If you’re new to sewing, don’t try to master all five Nahttypen in a single weekend. Pick one project and one seam, and stick with it until it feels natural.
- Sew a set of cloth napkins → Practice flat-felled seams on straight-grain fabric. No curves, no pressure.
- Make a sheer summer blouse → Learn French seams. Once they click, you’ll use them constantly.
- Hem a knit T-shirt → Try a twin needle or narrow zigzag for stretch without a serger.
Each seam you practice teaches you something real about how fabric behaves, how tension works, and how patience actually pays off. Those lessons carry into every project after.
If sewing becomes a regular part of your week and you’re thinking about turning your skills into something more, it’s worth exploring how to earn more in tips — though honestly, the first reward is just making something you’re genuinely proud of.
Final Thoughts
Here’s what I’ve genuinely learned after years of working through different Nahttypen: they’re tools, not rules.
Sometimes a French seam is overkill for a quick project. Sometimes a plain seam with a zigzag edge is completely fine. And sometimes, trying a new seam type just for the experience teaches you something no written guide can.
If you’ve been avoiding certain fabrics or patterns because you weren’t sure which seam to use, take a breath. Pick one Nahttyp, grab some scrap fabric, and stitch a few samples. That ten-minute practice session will save you more frustration than any article could.
And the next time you come across the word Nahttypen, you’ll know exactly what it means. More importantly, you’ll know which one belongs in your hands.
FAQs About Nahttypen
Do I need a special machine for different seam types?
Not really. A basic sewing machine handles plain seams, French seams, flat felled seams, and stretch stitches for knits without any trouble. A serger speeds up overlock seams, but it’s not a requirement to start.
Which Nahttyp is strongest for heavy fabrics?
Flat-felled seams are the strongest choice for non-stretch heavy fabrics like denim, canvas, or twill. For heavy knits, a reinforced overlock seam works well and keeps the stretch intact.
Can I combine seam types in one garment?
Absolutely, and experienced sewists do this all the time. You might use French seams along the side seams of a linen dress and plain finished seams on the inner sleeves. Mix based on visibility and wear, not habit.
Why do patterns often skip seam recommendations?
Most commercial patterns assume a plain seam with a standard allowance. They don’t always mention French or flat-felled seams because those require extra preparation steps. That’s exactly where your own knowledge of Nahttypen becomes useful — you can upgrade the construction yourself without waiting for a pattern to tell you.
Can I repair a torn seam using a different seam type?
Yes. In fact, choosing the right type for a repair often makes it stronger than the original. A split seam on jeans responds well to a flat felled repair. A fraying edge on a lightweight blouse can be re-sewn as a French seam if there’s enough fabric left in the allowance.
Disclaimer: This article is intended for informational and educational purposes. Seam recommendations are based on general sewing practice and personal experience. Results may vary depending on fabric type, machine settings, and technique. Always test on scrap fabric before cutting into your final project.